Getting Started
This guide helps you launch your Atlas bot and explore the platform in minutes.
Try Atlas First
Demo Bot & Webchatbot
Try the Demo Bot: - Telegram Bot: @SOLAtlasBOT - Community Group: Join Atlas Community
See Webchatbot in Action: - Visit DexGuru to see the webchatbot embedded on their site - Check out Burning Meme for gamification examples
Launch Your Own Bot
Quick Start (5 Minutes)
-
Go to Launcher — https://atlas.gurunetwork.ai/launcher
-
Follow the 4-Step Wizard:
Step 1: Community Identity (25%) - Define bot name, username, description, and type (Community or Personal)
Step 2: Connect Your Telegram Bot (50%)
- Get bot token from @BotFather (/newbot)
- Paste token into launcher
Step 3: Group Setup (75%) - Add bot to your Telegram group - Grant necessary permissions - Deployment starts automatically
Step 4: Ready (100%) - Deployment complete - Access bot, admin UI, and get env vars for local development
- Your Bot is Live!
- Bot is running in your own Kubernetes namespace
- URLs exposed in launcher UI
- Ready to use in minutes
Clone the Repo and Start Developing
Step 1: Fork the Repository
# Fork on GitHub
https://github.com/evahteev/sol-atlas

# Clone your fork
git clone https://github.com/your-username/sol-atlas
cd sol-atlas
Step 2: Get Environment Variables
- In Telegram Bot:
- Send
/admincommand to your deployed bot -
Bot responds with download link for env vars
-
Download Configuration:
- Click link to download
.envfile -
Contains all connection strings and secrets
-
Set Up Local Development: ```bash # Copy env vars cp .env.local .env
# Run development script ./run_development.sh # Spins up bot, API, frontend ```
What's Included: - Database URLs (PostgreSQL, Redis, Elasticsearch) - Service URLs (FlowAPI, EngineAPI, warehouse-api) - API keys and tokens - Feature flags
Step 3: Switch to Your Own Infrastructure
- Update Kubernetes Configs:
- Point to your own cluster
- Update namespace references
-
Configure your own ingress
-
Update Environment Variables:
- Use your own database URLs
- Configure your own service URLs
-
Set your own secrets
-
Deploy:
bash
   kubectl apply -f k8s/
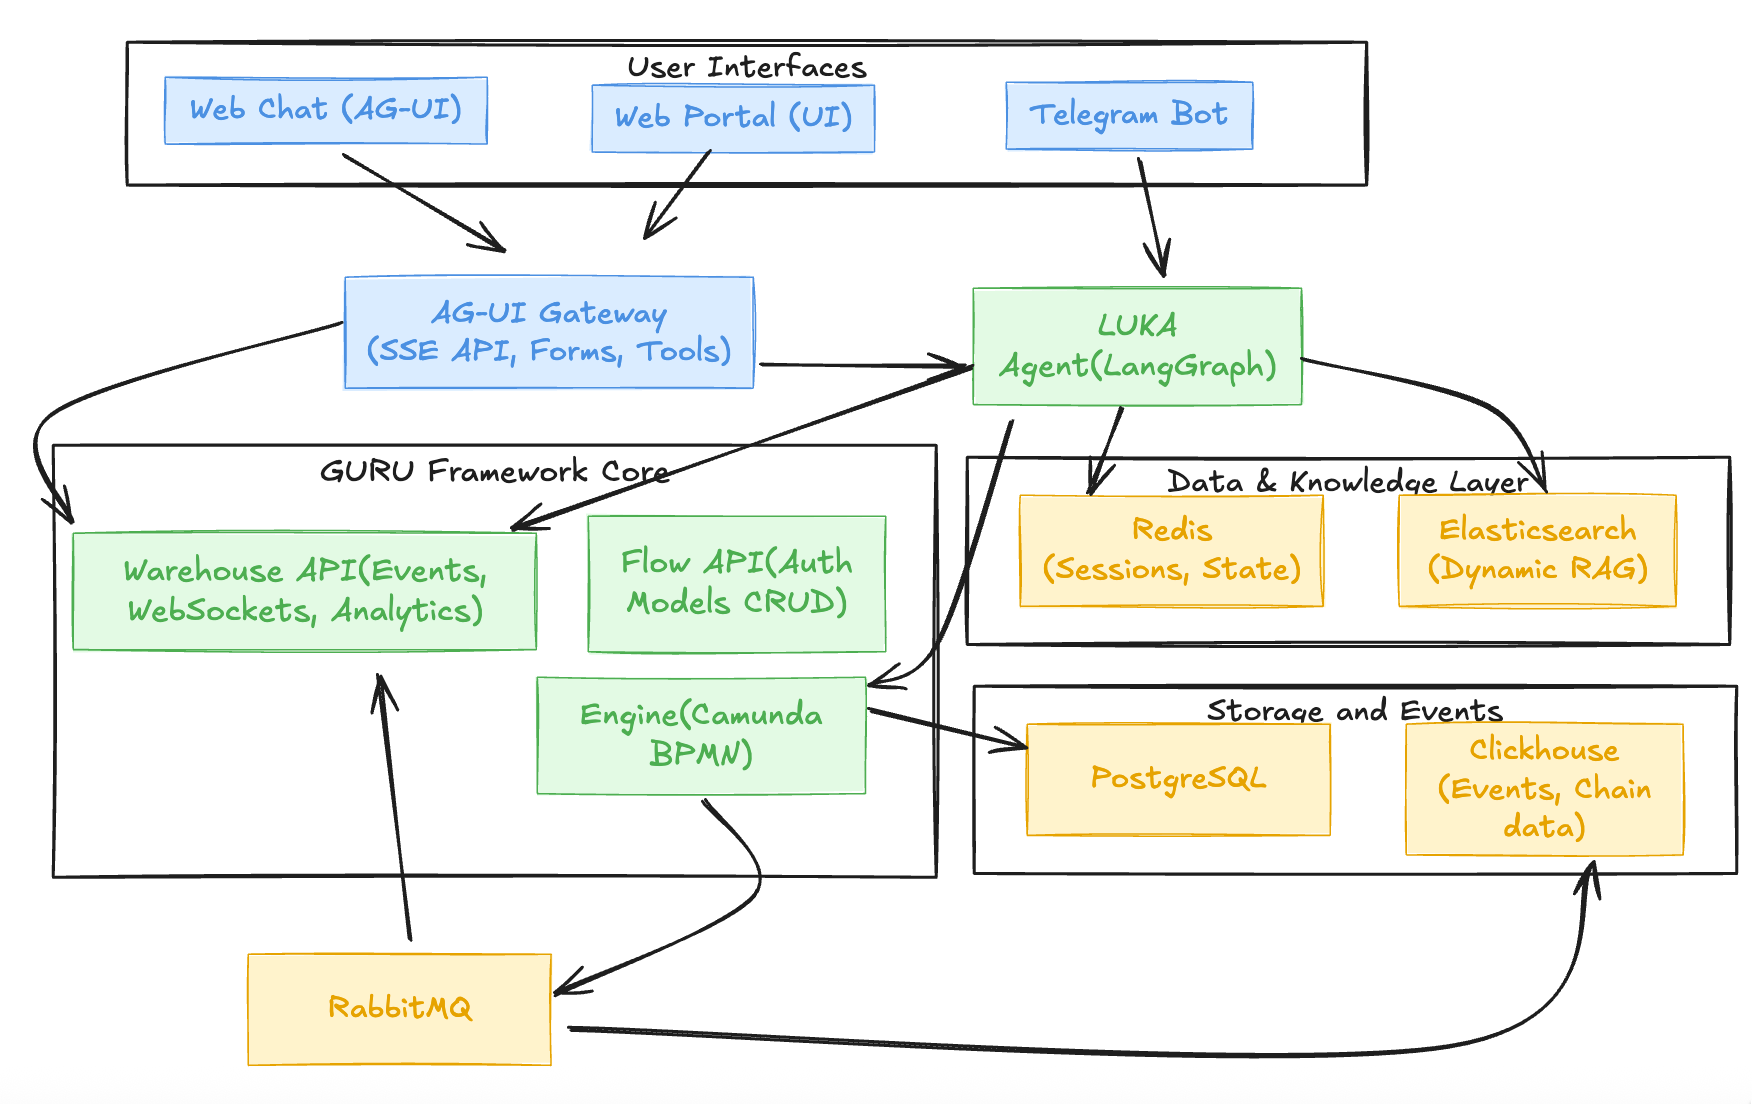
What You Get
Stateless Microservices
- bot-app — Telegram bot + AG-UI Gateway
- webchatbot-app — AI assistant for web
- engine-api — BPMN workflow engine
- flowapi-api — Auth, app config, analytics API
- warehouse-api — WebSocket event stream
Stateful Infrastructure
- PostgreSQL (via PgBouncer) — Primary database
- Redis — Cache and state management
- Elasticsearch — Knowledge bases
Next Steps
Customize Your Bot
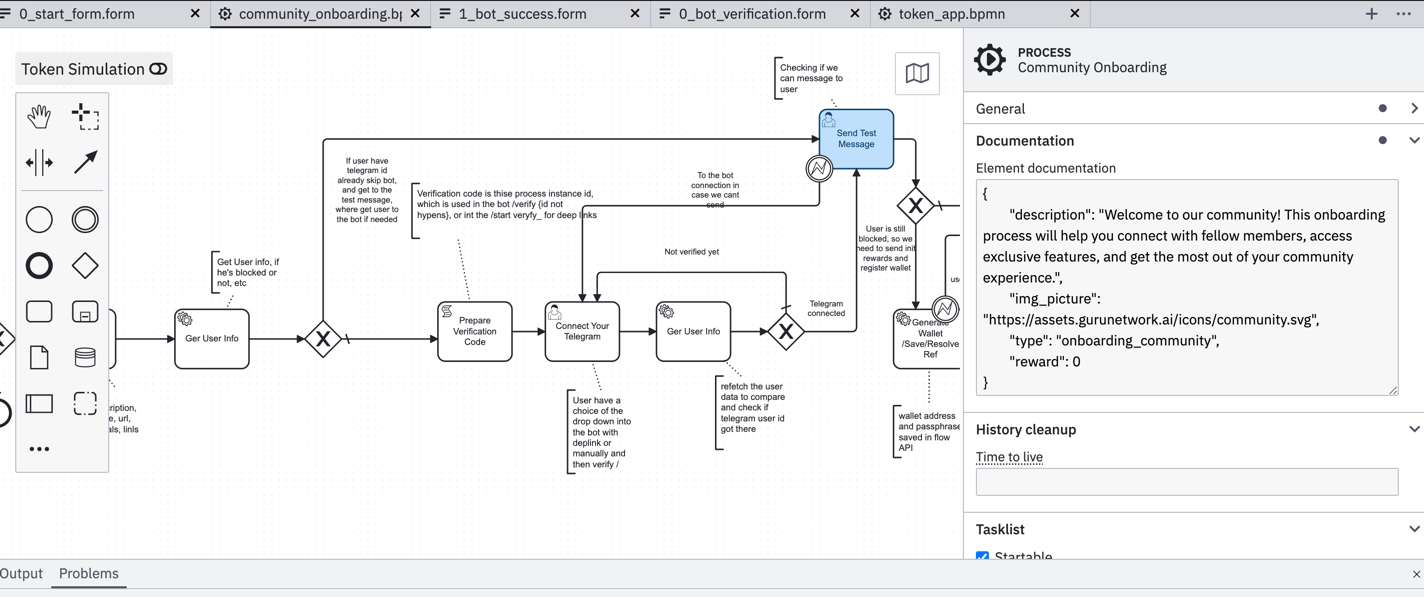
- Workflows — Edit BPMN diagrams (Modeler) or YAML
- Example BPMN
- Example Workflow
- Personas — Edit Context.md + YAML
- Example Config
- Tools — Add LangGraph tools or custom code
- Forms — Define in BPMN or generate with AI
- Example Forms
- UI — Customize webchatbot, admin portal
Best Practices
- Start simple — Basic bot + RAG (
camunda_enabled=false) - Add workflows — Enable Camunda for orchestration
- Version control — Workflows, personas, configs in git
- Test locally — Use
run_development.shagainst deployed infra - Iterate — Deploy, test, customize, repeat
Resources
Documentation
- Architecture Overview — architecture.md
- Launcher Wizard Guide — launcher-wizard.md
- Webchatbot Guide — webchatbot.md
- Components Guide — components.md
Examples
- BPMN Workflows — onboarding/community_onboarding.bpmn
- Forms — onboarding/Community_Onboarding_README.md
- Workflow Scenarios — sol_atlas_onboarding/
Open Source Projects
- Camunda BPMN Platform — Workflow orchestration
- AG-UI Protocol — Unified interface protocol
- LangGraph — AI layer for agentic workflows
- Elasticsearch — Search and analytics engine
Support
- Documentation: https://atlas.gurunetwork.ai/docs
- Community: https://t.me/SolanaAtlas
- GitHub Issues: https://github.com/evahteev/sol-atlas/issues
- Launcher: https://atlas.gurunetwork.ai/launcher